Category Archives: celebrations

Candy-free, junk-free, still awesome Easter egg hunt ideas!

easter-eggs-3165483_640

Easter is coming, and I’m usually stoked about it because to us, it’s a time to celebrate SPRING!!!! Being from Florida and now living in North Carolina, winter blues have become a depressing part of life. All the gray, dry limbs just make my heart sad. Even after ten years in NC, these dreary months are no fun. So Easter has become a celebration of all the gorgeous color that’s coming back to life in all its pastel glory!

We tend to do our own little egg hunts at home.  I like that it’s just us instead of the madness that happens at public egg hunts. Still, sometimes we struggle with what to put in them. We try not do to a lot of candy, but I’m a little sick of the non-candy alternatives. Seriously, our home is just about at capacity with all that tiny junk: the tiny plastic ‘toys’, hair bows that my daughter won’t wear anyway, more stickers, more temporary tattoos, tiny tubs of play-doh that dry up five minutes after you open them and turn into a crumbly mess all over the house….yeah. I’m done with all that.

So what to do? After some thought, we decided on money and power. What kid wouldn’t want that?

  1. Money: Our kids are starting to learn to save up for things they want. We have a bunch of spare change. Why not fill the eggs with some money? Change can add up quickly, and this will give them an extra chance to learn money management, counting and all that stuff.
  2. Power: We did this in the form of coupons. You know how some people do ‘love’ coupons for their significant other sometimes? Like “free massage” and stuff like that? We adapted this concept for easter eggs. Ours will include things like: choosing a restaurant, choosing a movie for family movie night, staying up past bedtime, choosing the next family outing, and some funny ones like ‘make daddy do the sprinkler dance’.

Admittedly, some of our easter eggs will still have candy and toys (mostly balloons and stick on mustaches). I was a bit worried that they wouldn’t enjoy it and it would all be a big fail, but they loved it! The coupons were so exciting for them, and it’s become a ‘thing’ in our house throughout the year.

And the actual Easter baskets? Our approach to baskets also follows our no-junk philosophy. We reuse the egg hunt baskets or ‘package’ everything in something that is part of the gift. One year we got the kids plastic chairs for the yard (the $5 walmart ones that are still kicking around our yard years later), so the ‘basket’ was the chair. We used beach buckets one year as well. We generally take it as an opportunity to stock up on spring and summer items that we’ll get them anyway, but are so fun. Some examples are:

  • beach towels
  • sidewalk chalk
  • bubble solution and a new cool bubble toy
  • flip flops
  • beach/pool toys

I hope these ideas help your spring celebrations and help keep some sanity in everyday life!

Our New Thanksgiving Tradition: Simplify and Do Our Own Thing

Happy Thanksgiving! I love this time of year. Everyone gets together, feasts together, and we all stop to focus on the good stuff in life.

Our celebration this year is different from our norm. Typically, we spend our Thanksgiving with family, on a big farm with all the usual trimmings: big turkey, stuffing/dressing, mac and cheese, pumpkin pie…the works. But this year, we’re not going. And I’m kind of excited. The years we’ve stayed home have usually had a major reason – usually baby-related (miscarriage, too close to due date, and then a brand-new baby). This year, a slew of small factors combined to keep us home, and I can’t wait to celebrate with just my little family of four-plus-dog.

If you know me, you’ve probably heard of my semi-rant about Thanksgiving. I just don’t understand why we cook a turkey, which is by nature dry, and what 80% of people have for lunch every day, to celebrate any holiday. I mean, how many times have you heard people say they’d rather have the sides than the main dish? Yet we all go out and pick out the ‘perfect’ turkey and spend almost an entire day babying it to try to make it ‘perfect.’ I don’t understand why we spend our precious time off stressing.

So this year, since we’re in control of the festivities, we decided to go off the beaten path. Which means simplifying what we do, and basing our choices on we’d enjoy, rather than what we’re supposed to do, while sticking to a basic framework of main dish, veggie, gratuitous carb and dessert.

Here’s our menu:
Grilled churrasco steaks with chimichurri sauce (sorry but steak > turkey any day, my friends)
green bean bundles (green beans tossed in olive oil, garlic and salt, wrapped in bacon and cooked til crisp)
mofongo (latin dish of green plantains mashed with pork cracklins – chicharrones to my people – and garlic)
apple crisp

Since I know my kids won’t eat the steak, and might or might not go near the mofongo (sometimes they devour it, sometimes they won’t to near it), I’m throwing chicken tenders and sweet potato fries in the oven – mostly so I won’t have to deal with whines of “I don’t like thaaaat!!!!”

Except for the kids’ meal and the chimichurri, everything is fresh and homemade, but simple. I don’t mind putting in effort, but I’m only putting effort into what we’ll truly enjoy. And as an added bonus, we get to choose where our splurges will be. So our apple crisp will be lower on the sugar and amped up in spices. I might hold back on the chicharrones in the mofongo to save a few calories.

As far as the ‘timeline’, we’ll sit down at the table when it’s all ready instead of trying to stick to a self-imposed deadline. We’ll keep the table simple, and I have cute disposables for dessert to lessen the cleanup.

Mostly, we just want time to relax and be together. Besides, we’d rather save the crazy for our son’s fifth birthday this weekend.

And that’s our Thanksgiving tradition: celebrating with those you love, and being thankful for what we have, and doing it in a way that will allow us to truly enjoy our time.


Patriotic Rag Wreath

Happy Independence Day! I hope you are all enjoying the day, celebrating our country and hopefully avoiding Hurricane Arthur!

patriotic rag wreath | the teal magnolia

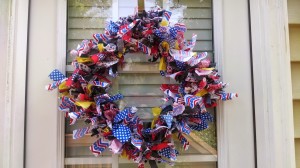
Do you have your red, white and blue out? My patriotic decor is sadly lacking, so I decided to channel my inner Betsy Ross (sort of) and make a rag wreath to show a bit of patriotism.

Here’s what I used:
a wire wreath form (or you can stretch out a wire hanger, but it won’t be as full)
1/4 yards of 5 different patriotic fabrics plus a few scraps of my stash
old jeans (two pairs of my old jeans and two pairs of my son’s old jeans)

I love this wreath. I wanted to make it very ‘American’ and what’s more American than jeans?

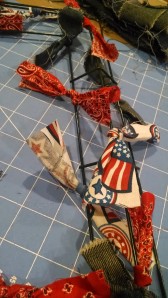
I cut the fabric into 2×6-inch(ish) strips. Some were narrower. Some were longer, some were shorter. It’s a rag wreath. It all works out. I found the denim easier to tie if it was narrower. Also, I tore some of the denim to make it more raggy. Denim with stretch in it doesn’t tear well. I used a rotary cutter for the fabric because it was easier and quicker and I know it will fray on its own.


IMG_20140525_230412744IMG_20140526_245114268

Then, I tied the strips to the wreath form. This is great to do while watching TV. The mom in me can’t sit still and has to constantly be doing something. Tie tie tie…then tie some more. I was surprised at how much fabric this took. I had originally gotten just three 1/4 yards, but ended up having to go get more and dip into my stash for a few extra strips (the blue polka dot and the yellow fabrics).

So that’s the rag wreath. I love how fluffy it is. Easy peasy and fun. I might add to the center of it, but for now, I’m enjoying seeing how it’s been unraveling. And now I have something handmade for all my patriotic holidays!

IMG_20140628_155840943


I’d love to see any patriotic crafts you’ve made! Link them below!

Thank you moms!

supermom-300x223

I am so proud to be a mom in today’s world. Really. There’s good and bad, but overall, it seems like for the first time, a mom can make the choices that work for her to lead her family in what works for her. Have I said ‘her’ enough? But it’s true. Crunchy, traditional, stay-at-home, glass-ceiling crusher…whatever it is, there are other moms there to support you. And yeah… there’s a fair amount of snark, but for the most part, we respect and help each other.

But it’s that support that makes me proud to be a mom. Having kids so far from any family has forced us to build a network. Thanks to friends, neighbors, social media, and of course, family, I have learned so much about being a mom.  Seeing all this around me has given me the confidence to try to be the mom I want to be.

Today, I wanted to share some little tidbits that have been ‘aha!’ moments for me that I’ve learned from other moms:

– freezing Gogurts to have yogurt pops: I spent the better part of last summer pouring yogurt into tiny ice pop molds and then fighting the molds to get the pops out. Gogurts are way easier, and I feel better about them than the regular ‘juice’ popsicles (although we have both).

– telling my kids ‘thank you for apologizing’ when they say they are sorry instead of ‘it’s okay’ because chances are, if they had to apologize for their actions, then what they did is not okay.

– asking ‘are you hurt or are you scared?’ when they are crying after a fall or something like that: It gets them to stop and think, and in the process, calm down a little bit and gives you a better idea of what’s really going on.

– brushing my daughter’s hair while she’s in the high chair having breakfast: She can’t run away from me, and she can’t fuss too much because she’s busy eating.

These are just a few of the solid, tangible ways that this great ‘village’ of moms around me has helped me, but there is so much more that I’ve learned that has allowed me to be a mom and to continue to grow in this amazing job. I can’t wait to see to see what else I learn as my kids grow. I only hope I’ve been able to support other moms as well.

So to all you moms – thank you! Thank you for the job you do for your kids and for the role you play in each other’s lives to make us all better.

Happy mother’s day!

Super Simple, Super Fun Camp Theme Kid’s Party

Camp Connor Collage

Last November, we celebrated my son’s fourth birthday party and we had so much fun. Fun. I keep using that word, and it makes me sound lame, but it was pure and simple fun. I’m not sure how I pulled off  taking a bunch of four-year-olds into the woods, letting them play on a rickety foot bridge over a creek, and then turned around and let them have pointy sticks and be close to fire, but I did – we all did. Not only did we survive, but we had a great time.

‘Camp’ is a pretty unusual theme, but it just made sense for us. One of my son’s favorite things to do is go for a hike in the woods behind our house, and he’s been asking to go camping for months, so it seemed like a no-brainer to make this his birthday.

I have to say, this party was a lot easier than I thought it would be. This is why I’m posting about it – at the end of the day, after everyone had gone home, I looked around and said “Man that was fun!” It didn’t cost a fortune, we all had fun, and I was able to enjoy it just as much as my guests. It was so much easier to host a full-blown kid party than I thought it would be.

I kept the invitation simple – just a burlap background with simple writing on it, and printed at the drug store one-hour-photo lab.  You can read more about my invitations in this post.

campconnorfinaledited

Party day came, and we were so excited! We hung primary color bunting across our back yard and our front porch, and covered tables and our kitchen island in primary colored table cloths (the plastic ones for easy cleanup).

Can I say one thing about the plastic bunting? It was actually the inspiration for the color scheme, mostly because it was $1 for a nine-foot length. We bought 5. They are still hanging in our backyard and I love them. It’s giving color to my otherwise winter-gray backyard. And I’m probably annoying my neighbors so, BONUS!!! Just kidding, I love my neighbors, and I’ll take down the bunting once there’s some green in the yard.

We set up our back yard to have different activities that you’d do if you were at camp:

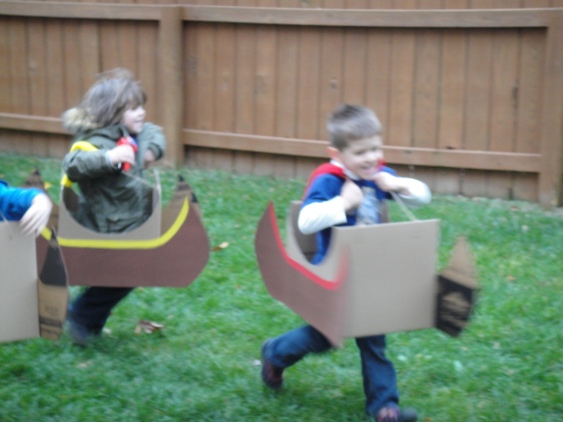
First, my favorite: These canoes made from cardboard boxes were so cute and fun. The kids had a blast racing and running around.  We sectioned off our side yard by hammering some 50-cent dowels into the ground and hot gluing some blue plastic table cloths to them to create a ‘lake’ area. Ideally, I would have filled the area with blue balloons, but a couple of our guests abhor balloons and the popping noise, so I was nice and refrained.
DSC04624

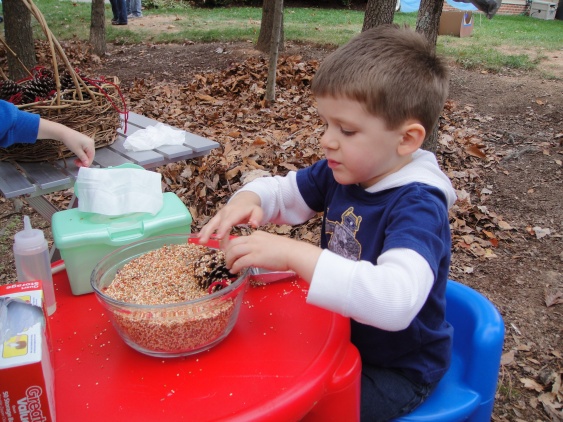
A camp party planned by yours truly would not be complete without a craft station, right? Surprisingly, it was a big hit! We made pinecone birdfeeders, and it was really easy to set up.  My son and I foraged in the woods for pinecones a couple of weeks before the party.  Then, I tied some yarn from my craft stash to them so that the kids could hang them.  I set them up in a basket with a squeeze bottle full of corn syrup, a bowl of birdseed, a box of zip top bags so the kids could have something to take them home in, and a box of wipes for cleanup. The kids squirted corn syrup on the pinecone and scooped birdseed over it so it would stick. The whole thing cost $6, and I have a ton left over. Normally, they’re done with peanut butter, but I wanted to avoid any allergy issues.
DSC04619

We also set up what we called ‘marksmanship’ which was really just a bean bag toss game that we had that we tied between two trees. To round off our camp, we set up some sports equipment, and of course, the playground was available.

I didn’t schedule the activities. I welcomed everyone, and they were all free to play and go from station to station as they pleased.

After we played for a little bit, we took the kids on my son’s favorite hike down to a stream and let them play in the woods for a little bit.

DSC04629

My son loves hiking in the woods behind our neighborhood. It was so cool to see my son, who can be shy at times, be so proud and comfortable as we hiked down the trails. I had planned to just go to the stream, but the neighborhood kids know the area well and all ran down the stream to a cracked, rickety footbridge, so all the kids followed down and we spent most of our time with our hearts in our throat waiting for a kid to fall in the water and/or the bridge to fully break. But nobody did, and the bridge survived. And I think the kids loved it.

After the hike, we headed back to the house for hot dogs (super easy prep: baked in the oven at 350 in disposable roasting pans until heated through, and then kept on the warm setting until needed), chips, cupcakes (store-bought!), and my favorite part of the whole night: the s’mores bar.

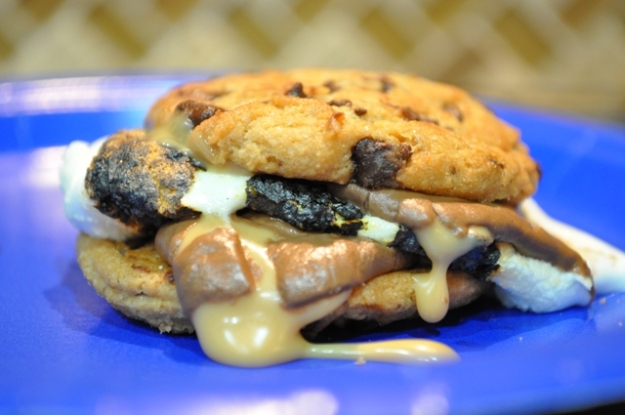
Y’all. We need to talk about this whole ‘s’mores bar’ thing. I’m here to tell you to think outside the graham. Somewhere in my planning, it struck me that it doesn’t have to be graham crackers. I started to think about different candy and cookie options. Why only grahams? Why only plain chocolate? And then I had to go for it.  I had graham crackers, chocolate chip cookies and shortbread cookies. And for the candy, I had regular chocolate, snack size peanut butter cups (not the small ones that are sold in a bag, but not the regular size you’d get at the candy stands in the checkout line) and rolos.  I could have gone crazier. I thought about having sliced bananas, strawberries, nutella, sprinkles to dip them in… but it was a camping-themed party for four-year-olds, and I went simple(ish).

I hope that if I make it to heaven, I’ll be greeted with this, my favorite combo: chocolate chip cookies with rolos and the requisite torched marshmallow.  Behold the beauty:
smore reduced

Confession: I was so wrapped up in the party that I forgot to take pictures of the s’mores bar(and pretty much everything else), so I totally made myself a s’more just so I had a photo for this post.  We all suffer for our art, don’t we?

Setup couldn’t have been easier. I just set everything out on my countertop, lit a couple of sterno fuel cans, and said “Everyone, enjoy!” And they did. You know how a lot of parents normally don’t try cupcakes at parties and act all like “Oh, I’m too grown up for that. I’ll let the kids enjoy.” ? Well, they won’t pass up a s’more bar.

This was such a fun and easy party, the way all parties should be. And the best part of it was that my son had an awesome day.

Before I wrap this up, I want to thank the ladies at All Wrapped Up Parties for this awesome post about why you should consider hosting a party at home, because it got me to finally click ‘publish’ on this post. As I read it this morning, I was fist-pumping in the air going “AMEN SISTAHS!!” So thank you, Julia and Alexis!

DIY invitations for pennies!

invitations

Y’all.  I feel like I’m totally cheating the party planning gods with this one, but it’s too much fun not to share.  But with 31-cent custom party invitations, how could I not? I hope I won’t get struck by lighting or something.

Hosting parties can get expensive, and invitations, especially for kid parties, are crazy expensive and something that will most likely be thrown away.  And since my two kids have birthdays just over a month apart, and right before the holidays, I definitely look for ways to keep costs down.  Besides, the less I spend on invitations, the more I have left for the actual party.

So when I was planning my daughter’s first birthday (which was just immediate family and a couple of close friends), I came up with the idea of designing an invitation and having it printed at the drugstore one-hour photo.  I didn’t think it would work.  But after one misfire and a second try, I got success!

Then, when planning my son’s party, I thought I’d go for it again.  It’s such a great way to get a completely custom invitation for a great price.  Each photo cost 20 cents, and then I got a box of ‘special occasion’ envelopes for less than $5 for 50.  With tax included, I had a 31-cent, fully custom party invitation.

For the designing part, I used Inkscape, a free design program that you can download.  It’s not as robust and user-friendly as Adobe Illustrator (oh, how I miss it!) or Corel, but it works for simple stuff.  But if you’re not familiar with design software, you can take any photo and print it.  You can use photo editing sites like PicMonkey to add text and details and just send it off to be printed.

What I love is that this can be so personal and be kept simple at the same time.  How about a beach ball with the party details written on it for a pool party? Or your child holding a poster board with the information written on it?  Or standing by a fire truck for a firefighter party?

I just love how they turned out.  And it’s such a cool and inexpensive way to set the tone for your next party.  Do you think you’ll try it?

Sparkle! Shimmer! Glitter! Glow!

Want to add a little bit of shimmer to your stuff? I have just the thing for you, and it’s so easy.

A couple of months ago around my birthday, I was messing around with different cake decorating ideas, and came across DIY shimmer spray. Most people were real-deal cake decorators and had fancy airbrushes, but I’m not at that level.  But a 97-cent travel spray bottle?  Yup. That’s more my level.

All I did was add a capful or two of cake decorating pearl dust to a travel-size spray pump and filled it with vodka.  Shake, shake, shake and you’re ready to spray.

DSC_0655It’s so pretty to watch!  It will settle as it sits, but you can just shake it up over and over.

It works best when you do light layers from far away. It gave my cake frosting a nice, subtle shimmer that was a great backdrop to the decorations, which were stylized  peacock feathers (kind of) that were dry brushed with pearl and gold shimmer.

cakecrop

But it’s not just for cakes.  Anything can be shimmered! I got a little shimmer crazy the other day and used it on some flowers that were starting to wilt.  I spritzed them only once and it gave them a really sweet, subtle shimmer.

sparkleflowertext

I’m thinking this would be really cool as an alternative to traditional glitter, which can be so much sometimes. Sometimes you just want something a little more subdued, you know?  I can see this on some simple snowflake sugar cookies or on some pinecones this Christmas. I might be shimmering the mashed potatoes if someone doesn’t stop me.

And yes, it’s vodka, so use your discretion when using it on edibles.  From what I’ve read, the vodka evaporates.  In fact, a lot of professional cake decorators use vodka for painting and spraying – it’s pretty common, they just say it’s ‘extract’.

Anyway…I got a little shimmer-happy and sprayed my arm, and I think the evaporation thing is true.  It was dry almost as soon as it landed on my arm.

Boo! Halloween Wreath

wpid-2013-10-07_10-01-53_106.jpg

I just had to share this wreath.  I usually don’t do much in terms of decorating for Halloween – I’d rather focus my energy on fall décor, because I can use it for months, whereas Halloween is only doable for a couple of weeks.  However, this year is different. I don’t know what came over me, but I decided I absolutely, positively had to have a Halloween wreath hanging on my door, otherwise the world would end.  And of course, I can’t just buy something, I had to make it.

I started out with half a yard of glittery BOO! Halloween fabric that I cut into 3 inch strips across the width of the fabric with my handy dandy rotary cutter.

Then I hot glued one end of a strip to my wreath form (those cheap straw ones that come wrapped in plastic) and wrapped it around until I couldn’t wrap it around anymore trimmed it and glued it so the glue was always on the back of the wreath.  I repeated the process until the wreath was covered.  It took me four strips, and I almost needed a fifth.

2013-10-06_14-47-04_584

Then I decided I needed a little ghost family.  There are a lot of steps for this, but it was pretty easy.  It took me about 20 minutes.  I’ll list the supplies for this part:

2013-10-06_15-09-26_458

– 2-inch foam balls
– skewers
– foam block or something to hold skewers up (I tried an empty tissue box, and it wasn’t quite strong enough, but I made it work)
– watered down modge podge (I had 1/4 of a medium sized bottle left, and I filled it with water, shook it, poured it out, and added 1 1/2 more bottles of water to it, although I probably didn’t need the extra 1/2)
– container for the modge podge (I used an old wipes container)
– 8×8-inch (or so) squares of cheesecloth (about 4 or 5 per ghost)
– gloves (nice, but not required)

Here’s how to do it:
1. Put a skewer in each ball so it looks like a lollipop.  Stick it into the foam, with plenty of space for you to work.

2013-10-06_15-14-40_691

2. Soak a piece of cheesecloth in the modge podge and wring it out.

3. Lay it over the foam ball, but a little off to the side. Repeat with three or four more pieces, laying each one opposite from each other.

4. Do the same thing for all the foam balls.

5. Let them dry. This is what they will look like when they are drying (and when they are dry):

2013-10-06_15-37-14_328

The modge podge will stiffen the fabric and keep it from fraying, but it will still look flowy.  You’ll be able to work it a little bit, almost like wire mesh. Just an FYI- I don’t think modge podge is supposed to attract killer bugs, but a bee kept dive-bombing me and the ghosts while I was working and then a preying mantis nestled itself between the ghosts while they were drying and jumped at me when I moved them. So just watch out if you work outside. Also, if you’re wondering what I was doing with  the foam brush, I thought that by brushing more modge podge on the top, it would help it stick to the foam, but it didn’t.  I ended up putting a dab of hot glue where you can’t see it.

So the ghosts are done! Yay! Now to mount them onto the wreath you’ll need:
– hot glue
– metal floral hooks (97 cents for 100 of them at Wal-Mart)
– craft knife

Here’s what you’ll do:
1. Glue down the cheesecloth to the foam ball by lifting off the cloth, putting down a blob of glue and quickly putting the cheesecloth back in.  **Make sure you put the glue towards the back of the ghost’s head, but not dead center in the back so that you leave room for the floral hook.  Think of where a ponytail would go, if that makes sense.**

2. With the craft knife, cut a slit as wide as the floral hook in the back of the ghost.  I twisted the knife a little to make it wider. {little side note story: I used a small pink Swiss army knife that my brother gave me for Christmas when I was in middle school.  I still use that thing almost every day, can you believe it?}

3. Shove the hook into the hole so the pointy ends stick out, making sure they’re far enough in so that they won’t go through the wreath.

4. Decide where you want the ghosts on the wreath, and stick them in.  They are pretty solid, but I went back and hot glued them in just to be sure.

5. Trim up any jagged edges on the cheesecloth.

Finishing it up:
Break out your craft stash and go to town! I used googly eyes and puffy paint to add eyes and a smile to each ghost.  Then I used some leather cording, felt and more puffy paint (yay!) to make a little pennant banner that says “BOO!”

I used some of the cording, hot glue and floral pins to hang the wreath. I also used scraps from the fabric to cover up anything on the back that might be unsightly so that it had a nice, finished look all around.

wpid-2013-10-07_10-01-53_106.jpg

Do you decorate for Halloween?  I want to see your projects!

Super Fun Mid-Week Kid Birthday

So my little boy has turned three years old.  Wow. I cannot believe he’s grown up so quickly! I have to say, I was a little stumped about how to celebrate his birthday.  Three seems to be a big year – they are finally old enough to really enjoy all the fuss, so it’s really fun to celebrate.  But how?

As much as I wanted to give him a real party (and had almost the whole thing planned out before the baby was born), I realized that it was too much for me to take on at the time.  But I still wanted to make him a cake and celebrate.  I just needed the perfect inspiration, which was escaping me.

After asking around on facebook, a friend who thought I was having a party suggested setting up a cupcake bar so the kids could do whatever they wanted to do to their cupcake.  And I liked the idea of him decorating the cake, but wasn’t quite 100% sold on it.

Then it hit me how absolutely perfect that was.

I mean, what does a soon-to-be-three-year-old want more than anything in the world? Especially one whose whole life has been turned upside down in every which way within the past two months?

Control.

What my son likes most in the world right now – more than Cars stuff, chocolate chip cookies, trains and playing in leaves combined – is calling the shots, and with good reason.  In the past few weeks, his whole world has been flipped about ten times over.  All his friends moved to a new classroom without him, his favorite teacher left the school, he’s been potty training and let’s not forget about a new baby in the house and the constant in and out of visitors that’s resulted from that and then to finish off this crazy time, he’s moved up to the next classroom which is structured completely differently from his previous one.  Just in time for the craziness of the holidays… it’s no wonder he’s trying to make everything go his way.

So I ran with it.  I decided he’d have as much control of his birthday as he could.  The day before his birthday, he helped make his cake.  Cooking is one of this favorite activities, so he was in heaven.  I made it even more personalized by dividing the batter and letting him choose colors to dye the batter and then letting him fill the cake pans by pouring spoonfuls of the different colors so we got a crazy supercolor marbled cake.  That night, I frosted the cake.

DSCN0497

The following day – his birthday – I set up the cake on the table with all sorts of stuff to decorate: glitter gels, Cars sugar decorations, edible dinosaur decals, sprinkles and tiny chocolate chip cookies the size chocolate chips.  When he came home from preschool, he saw his birthday table and his eyes popped open wide.  Just what this mama wanted.

decorate

We decorated the cake while dinner was cooking (and I use the term ‘cooking’ very loosely – I popped a frozen pizza in the oven because pizza is his favorite and I’m not superwoman so I wasn’t about to cook from scratch that day).  We had so much fun and he was so proud of having done up his cake. And as an added bonus, we got some quality family time in what would normally be a hectic weeknight where we didn’t really connect.

DSCN0531

What do you think of this confectionary masterpiece?

finished product

slice

Infant Mermaid Costume DIY (Super Easy)

So, remember how I bribed my daughter so she’d be born before I had to get induced?  Well, here are the results of the sparkly Halloween costume I promised her ~ a mermaid!

Now, I realize it’s kind of nuts to DIY a halloween costume the week after giving birth. I fully believe in having time to bond with the baby, get the family settled and give my body time to heal before I jump back into ‘regular’ life (although now that I’m a SAHM, I’m not sure how realistic that is).  I know a lot of people go back to work and start training for marathons the day they leave the hospital, but that’s just not me.  So it felt somehow wrong to make a Halloween costume for a ten-day-old baby. But a deal is a deal, and I couldn’t bail on this one.  I mean, how bad would that be to not go through with the first deal I make with my own daughter?

And it’s not like this was difficult to do.  All it took was a mad dash though Joann’s a few days after she was born for some shimmer tulle (one yard each of three colors) and some elastic sequin trim.  The baby stayed in the car with my hubby while I ran into the store.  And then I foraged through my craft stuff for anything else I needed, which ended up being a square of felt, a rubber band, a needle and thread and a rhinestone button.

I began by making the skirt by following directions for a tutu (like this one except that I cut my own strips of tulle), but I made mine long enough that it would go past her legs and then some.  I tied it a little past her feet with a rubber band, and then I put trim around the waist and around the rubber band, barely stitching it in place by hand.

I then placed my square of felt (the ones that are like 39 cents in the kids craft area at Wal-Mart – nothing fancy here) over a long-sleeved onesie and cut it to fit in a bodice-like shape so that it wrapped around just a bit past the sides. I used some leftover tulle to make the bandeau top, and added a bit of sequin trim.  I glued the tulle to the felt and then hand-stitched the felt to the onesie so that I can use it again.

For the headband, I measured out how much sequin trim I needed and glued the ends together.  Then I made three yoyos with two layers of tulle each so they’d be full.  I sewed them on and sewed a rhinestone button on the center one because every infant mermaid headband needs bling.  I should have done some sort of pearl to go with the mermaid/ocean theme, but I used what I had on hand.

This project is super easy.  I think it probably took about 45 minutes, and that’s because I hand-stitched a lot of it so that I can reuse the materials later. I was able to easily do it between feedings here and there over a couple of days, despite being in that post-partum recovery/newborn adjustment time.