Candy-free, junk-free, still awesome Easter egg hunt ideas!

easter-eggs-3165483_640

Easter is coming, and I’m usually stoked about it because to us, it’s a time to celebrate SPRING!!!! Being from Florida and now living in North Carolina, winter blues have become a depressing part of life. All the gray, dry limbs just make my heart sad. Even after ten years in NC, these dreary months are no fun. So Easter has become a celebration of all the gorgeous color that’s coming back to life in all its pastel glory!

We tend to do our own little egg hunts at home.  I like that it’s just us instead of the madness that happens at public egg hunts. Still, sometimes we struggle with what to put in them. We try not do to a lot of candy, but I’m a little sick of the non-candy alternatives. Seriously, our home is just about at capacity with all that tiny junk: the tiny plastic ‘toys’, hair bows that my daughter won’t wear anyway, more stickers, more temporary tattoos, tiny tubs of play-doh that dry up five minutes after you open them and turn into a crumbly mess all over the house….yeah. I’m done with all that.

So what to do? After some thought, we decided on money and power. What kid wouldn’t want that?

  1. Money: Our kids are starting to learn to save up for things they want. We have a bunch of spare change. Why not fill the eggs with some money? Change can add up quickly, and this will give them an extra chance to learn money management, counting and all that stuff.
  2. Power: We did this in the form of coupons. You know how some people do ‘love’ coupons for their significant other sometimes? Like “free massage” and stuff like that? We adapted this concept for easter eggs. Ours will include things like: choosing a restaurant, choosing a movie for family movie night, staying up past bedtime, choosing the next family outing, and some funny ones like ‘make daddy do the sprinkler dance’.

Admittedly, some of our easter eggs will still have candy and toys (mostly balloons and stick on mustaches). I was a bit worried that they wouldn’t enjoy it and it would all be a big fail, but they loved it! The coupons were so exciting for them, and it’s become a ‘thing’ in our house throughout the year.

And the actual Easter baskets? Our approach to baskets also follows our no-junk philosophy. We reuse the egg hunt baskets or ‘package’ everything in something that is part of the gift. One year we got the kids plastic chairs for the yard (the $5 walmart ones that are still kicking around our yard years later), so the ‘basket’ was the chair. We used beach buckets one year as well. We generally take it as an opportunity to stock up on spring and summer items that we’ll get them anyway, but are so fun. Some examples are:

  • beach towels
  • sidewalk chalk
  • bubble solution and a new cool bubble toy
  • flip flops
  • beach/pool toys

I hope these ideas help your spring celebrations and help keep some sanity in everyday life!

Our New Thanksgiving Tradition: Simplify and Do Our Own Thing

Happy Thanksgiving! I love this time of year. Everyone gets together, feasts together, and we all stop to focus on the good stuff in life.

Our celebration this year is different from our norm. Typically, we spend our Thanksgiving with family, on a big farm with all the usual trimmings: big turkey, stuffing/dressing, mac and cheese, pumpkin pie…the works. But this year, we’re not going. And I’m kind of excited. The years we’ve stayed home have usually had a major reason – usually baby-related (miscarriage, too close to due date, and then a brand-new baby). This year, a slew of small factors combined to keep us home, and I can’t wait to celebrate with just my little family of four-plus-dog.

If you know me, you’ve probably heard of my semi-rant about Thanksgiving. I just don’t understand why we cook a turkey, which is by nature dry, and what 80% of people have for lunch every day, to celebrate any holiday. I mean, how many times have you heard people say they’d rather have the sides than the main dish? Yet we all go out and pick out the ‘perfect’ turkey and spend almost an entire day babying it to try to make it ‘perfect.’ I don’t understand why we spend our precious time off stressing.

So this year, since we’re in control of the festivities, we decided to go off the beaten path. Which means simplifying what we do, and basing our choices on we’d enjoy, rather than what we’re supposed to do, while sticking to a basic framework of main dish, veggie, gratuitous carb and dessert.

Here’s our menu:
Grilled churrasco steaks with chimichurri sauce (sorry but steak > turkey any day, my friends)
green bean bundles (green beans tossed in olive oil, garlic and salt, wrapped in bacon and cooked til crisp)
mofongo (latin dish of green plantains mashed with pork cracklins – chicharrones to my people – and garlic)
apple crisp

Since I know my kids won’t eat the steak, and might or might not go near the mofongo (sometimes they devour it, sometimes they won’t to near it), I’m throwing chicken tenders and sweet potato fries in the oven – mostly so I won’t have to deal with whines of “I don’t like thaaaat!!!!”

Except for the kids’ meal and the chimichurri, everything is fresh and homemade, but simple. I don’t mind putting in effort, but I’m only putting effort into what we’ll truly enjoy. And as an added bonus, we get to choose where our splurges will be. So our apple crisp will be lower on the sugar and amped up in spices. I might hold back on the chicharrones in the mofongo to save a few calories.

As far as the ‘timeline’, we’ll sit down at the table when it’s all ready instead of trying to stick to a self-imposed deadline. We’ll keep the table simple, and I have cute disposables for dessert to lessen the cleanup.

Mostly, we just want time to relax and be together. Besides, we’d rather save the crazy for our son’s fifth birthday this weekend.

And that’s our Thanksgiving tradition: celebrating with those you love, and being thankful for what we have, and doing it in a way that will allow us to truly enjoy our time.


I’m guest posting for Vend Raleigh today – check it out!

Some of you may know that I am lucky enough to be part of Vend Raleigh’s Illuminate planning committee. Today, I got the chance to blog over there about the absolute craziness that I put myself through to get to the conference last year, and why it’s #worthit.

To all of you how have a craft shop online, or are thinking of starting your own business (any type of business), or have started but don’t know how to take it to the next level, check out the blog post and poke around the Vend Raleigh site, the Illuminate 2014 page, event page and member directory. It’s a world of resources designed for mompreneurs.

Here’s a taste of my post. Hope you enjoy it!

“Let’s take a little trip back in time to the summer of 2013, shall we? 

Back then, I was a mom of a 3 ½-year-old boy and a 10-month-old baby girl. I hadn’t slept more than three hours or so at a time in well over a year, I was exhausted and really didn’t think I could handle more on my plate. Despite all that, something was telling me that I needed to revitalize my small sewing business. I had started it right before I found out I was pregnant with our second baby, but the teal magnolia sat dead in the water with the occasional blog post and custom order as I took time to focus on our family. But I wanted to make it grow. I wanted to be me again, to come out of that post-baby fog and create again. “

Click here to read the rest!

Patriotic Rag Wreath

Happy Independence Day! I hope you are all enjoying the day, celebrating our country and hopefully avoiding Hurricane Arthur!

patriotic rag wreath | the teal magnolia

Do you have your red, white and blue out? My patriotic decor is sadly lacking, so I decided to channel my inner Betsy Ross (sort of) and make a rag wreath to show a bit of patriotism.

Here’s what I used:
a wire wreath form (or you can stretch out a wire hanger, but it won’t be as full)
1/4 yards of 5 different patriotic fabrics plus a few scraps of my stash
old jeans (two pairs of my old jeans and two pairs of my son’s old jeans)

I love this wreath. I wanted to make it very ‘American’ and what’s more American than jeans?

I cut the fabric into 2×6-inch(ish) strips. Some were narrower. Some were longer, some were shorter. It’s a rag wreath. It all works out. I found the denim easier to tie if it was narrower. Also, I tore some of the denim to make it more raggy. Denim with stretch in it doesn’t tear well. I used a rotary cutter for the fabric because it was easier and quicker and I know it will fray on its own.


IMG_20140525_230412744IMG_20140526_245114268

Then, I tied the strips to the wreath form. This is great to do while watching TV. The mom in me can’t sit still and has to constantly be doing something. Tie tie tie…then tie some more. I was surprised at how much fabric this took. I had originally gotten just three 1/4 yards, but ended up having to go get more and dip into my stash for a few extra strips (the blue polka dot and the yellow fabrics).

So that’s the rag wreath. I love how fluffy it is. Easy peasy and fun. I might add to the center of it, but for now, I’m enjoying seeing how it’s been unraveling. And now I have something handmade for all my patriotic holidays!

IMG_20140628_155840943


I’d love to see any patriotic crafts you’ve made! Link them below!

Caramel S’mores Popcorn

10415563_10204046008973307_7308107215571764889_n

A few months ago, I saw an article (I think a Dr. Oz thing???) about how microwave popcorn is full of chemicals and is linked to lung cancer (something about there being added chemicals to make it smell good while popping) My son loves popcorn, so we have it frequently in our house, and hearing this kind of freaked me out. I had some regular non-microwave popcorn left over from Christmas gifts that I made for neighbors (vanilla glazed cranberry popcorn), so I switched to using the stove type. I love it. It takes just as long as microwave popcorn, and it’s a really cool thing that my son gets to help. He helps pour/spoon the oil and the kernels, and gets to watch everything pop (we use a deep pan that has a glass lid so we can watch).

But it’s a little boring. For normal days, a little fine sea salt mixed in with the oil you’re using to pop is delicious. But sometimes I want more.  And more is what I did when my son and I were having a sleepover last night.

I don’t know where the idea came from, but I’m so glad it came to me.  And, like everything I do, it’s super easy, but packs a big wow factor.

Without further ado, here’s the “recipe” if you can even call it that. I didn’t put measurements, because it’s really up to you how much of everything to add.

Ingredients:
popcorn
caramel sauce (I use this super easy, super quick 3-ingredient recipe, but I zap it a minute or two longer until it gets thick)
chocolate chips
mini marshmallows
Golden Grahams cereal
salt (optional. I love salty/sweet stuff, so I used kosher salt, but for a more subtle version, I’d use fine sea salt)

Method:
Pop your popcorn. Microwave is fine, but if you want to try the stove top type, I’ve added directions at the end of this post. Spread the popcorn out onto a sheet pan.

Drizzle a little bit of the caramel sauce over the popcorn. Sprinkle chips, marshmallows and cereal over the popcorn. Add more caramel sauce. Sprinkle with salt if you’d like.

To make stove-top popcorn:
It’s so easy. I put a little oil in a deep wide pan. I like to use vegetable or coconut oil (this is where I would add salt if I’m keeping my popcorn plain).I pour in enough kernels to almost cover the bottom of the pan. Then, I turn the burner on high and let it go. When it starts to pop, I shake it a few times. Just like microwave popcorn, you’ll hear/see the popping slow down. Take it off the heat, and you’re done. I like to move it to a different bowl or pan right away because it tends to scorch a little bit if you leave it in the hot pan.

Ta-dah! You have fancy popcorn!


DIY Coffee Hand Scrub

the teal magnolia | coffee + coconut oil scrub

I love to cook. Something about the chopping and sizzling is almost therapeutic to me. What I don’t love is the lingering garlic smell on my hands that no matter what I do (other than sacrifice a lemon for its juice – what a waste of a lemon!), just won’t go away. It’s an annoying problem, especially now that I’m a mompreneur and SAHM because I tend to have a lot of meetings in the evenings and do my work at night.  This leaves me with garlicky hands when I go on business meetings (or GNOs) or when I go work with the beautiful fabrics that I get to play with for the shop.  Not good.

And then I found a solution that seemed to float down from heaven on a cloud – it was that perfect. I came across coffee soap, and saw that it was sometimes labeled as ‘kitchen soap’ because it helps eliminate those smells from your skin.

Well, considering how how big a DIYer I am, I decided that while I may not be a soap-maker, I can certainly make a scrub with the copious amounts of coffee grounds that we go through in our house. And it couldn’t be simpler.

Ingredients:
used coffee grounds (seriously – used coffee grounds. Instead of emptying my used coffee grounds into the trash, I put them in a plastic container)
coconut oil

Method:
1. Place coffee grounds in a container.
2. Add about half the amount of coconut oil as you have coffee grounds. I started with 1/2 of espresso grounds an a couple of teaspoons of coconut oil.
3. Mix well. Add coconut oil or coffee to get the consistency you like. I like mine to be like gritty cookie dough, so heavy on the coffee and easy on the oil.
4. Store in a closed container near your kitchen sink.

That’s it. It’s that simple and it works. It gets rid of smells and exfoliates your hands too! I just put a little bit (about a quarter-size amount) in my hands and ‘wash’ them. I then follow up with soap to get the oil off. And to all my mamas out there – you know how getting diaper cream off your hands is nearly impossible? This works for that as well.

I’ve found that I can add more coffee to it and it magically still stays together.

I love that I’m using something that would normally go in the trash – getting just a little more use out of what we have. I like that I don’t waste coffee – I’ve already enjoyed my espresso, and I’m simply using up the by-product.

And the super bonus for you evil wevils out there is that it looks like Oreo truffles. Oh the pranks I could pull!

Thank you moms!

supermom-300x223

I am so proud to be a mom in today’s world. Really. There’s good and bad, but overall, it seems like for the first time, a mom can make the choices that work for her to lead her family in what works for her. Have I said ‘her’ enough? But it’s true. Crunchy, traditional, stay-at-home, glass-ceiling crusher…whatever it is, there are other moms there to support you. And yeah… there’s a fair amount of snark, but for the most part, we respect and help each other.

But it’s that support that makes me proud to be a mom. Having kids so far from any family has forced us to build a network. Thanks to friends, neighbors, social media, and of course, family, I have learned so much about being a mom.  Seeing all this around me has given me the confidence to try to be the mom I want to be.

Today, I wanted to share some little tidbits that have been ‘aha!’ moments for me that I’ve learned from other moms:

– freezing Gogurts to have yogurt pops: I spent the better part of last summer pouring yogurt into tiny ice pop molds and then fighting the molds to get the pops out. Gogurts are way easier, and I feel better about them than the regular ‘juice’ popsicles (although we have both).

– telling my kids ‘thank you for apologizing’ when they say they are sorry instead of ‘it’s okay’ because chances are, if they had to apologize for their actions, then what they did is not okay.

– asking ‘are you hurt or are you scared?’ when they are crying after a fall or something like that: It gets them to stop and think, and in the process, calm down a little bit and gives you a better idea of what’s really going on.

– brushing my daughter’s hair while she’s in the high chair having breakfast: She can’t run away from me, and she can’t fuss too much because she’s busy eating.

These are just a few of the solid, tangible ways that this great ‘village’ of moms around me has helped me, but there is so much more that I’ve learned that has allowed me to be a mom and to continue to grow in this amazing job. I can’t wait to see to see what else I learn as my kids grow. I only hope I’ve been able to support other moms as well.

So to all you moms – thank you! Thank you for the job you do for your kids and for the role you play in each other’s lives to make us all better.

Happy mother’s day!

Hello Spring Pinwheel Wreath

I am so glad that warm days are here again! Being a Florida girl, I tend to get the winter blues pretty badly. Don’t get me wrong – I love the cold weather and snuggling up under a pile of blankets, but the lack of color and vibrancy gets to me. A few weeks ago, I had reached my breaking point with all the gray, dreary days. I had to do something, but couldn’t figure it out.

And then it hit me out of the blue. I needed a pinwheel wreath. Something that would counteract all the icy weather. Something that screamed spring, cool breezes, sunshine and fun. The more I thought of it, I also pictured soft grass and lots of color in the form of a yarn wreath.

Two things stopped me: 1) I am absolutely not a paper crafter, and 2) I vowed I’d never ever make a yarn wreath after getting overly annoyed with the process on my first try after only getting about an eighth of the way around. So a yarn wreath with paper pinwheels seemed like the most intimidating craft project ever.

Still, the idea kept nagging at me, and I knew I had to do it.

I found gorgeous fuzzy yarn in different shades of springy green and white. Wrapping the wreath wasn’t so annoying this time around.  A little time-consuming, but not bad. I guess these days, after spending my daylight hours running after two kids, I welcome anything that is calm and monotonous in my down time.

IMG_20140303_234719818

I then made pinwheels from double-sided scrapbooking paper in two sizes using 6×6 and 3×3 squares and used my sewing pins for the center.

IMG_20140310_144510496

I sprayed the pinwheels with super high shine modge podge spray to protect them from the elements a little bit. I did two layers on the back, and then about five on the front. You don’t need to do that many layers on the front, but I loved how shiny it looked and kept doing more. It almost looks like plastic. So cool. Once they were dry, I pinned them into place on the wreath.

It needed something more, so I thought a fun ‘hello!’ would be cute. I used shrink plastic (also known as Shrinky Dinks) and my Slice cutter to cut out four-inch letters, colored them in with a purple marker, baked them and hot glued them onto the wreath.

IMG_20140310_223806783
Cute, but… I wasn’t loving the purple letters. After a week or so, it really bugged me and I took it down until I could figure out what to do. It looked too plain without the letters, but I hated the purple. I tried painting them yellow, but it didn’t work. Finally, I modge-podged some extra paper from the pinwheels and they became orange with white dots.

wreath closeup

I just love how it turned out. So simple, so fun, and different from what you normally see. Most  of all, I love that it screams “SPRING!!!!”

Show-and-Tell: Hand-Embroidered Pillow


front edited

back close edited

One of the things I love most about having a handmade business is the creativity that comes with it. It’s so great to talk to people and take on a challenge. And I just have to tell you about a project I got to do recently.

A little bit ago, a client wanted something special for her goddaughter’s first birthday. Something that would show the little girl how much her godmother loves her, even though they’re far apart. A shirt? Nah – she’ll grow out of that…A blanket?  I’m sure a baby girl has about a million and three baby blankets. Nothing seemed special enough.

I’ve gotten to know this S (my client) fairly well – she’s not only a client, she’s an awesome neighbor and friend. One thing that is clear the instant you meet her is that she has a huge, loving heart. This gift needed to be personal, and illustrative of how much love she has, especially for someone as dear to her as her goddaughter.

Then it hit me: a pillow! Something that the little girl can cuddle with when S isn’t around to cuddle with her. We settled on a pillow in the shape of the state with two hearts connecting the locations with a saying  on the back.

And to give it an extra personal touch, I had S write the message on the fabric with a water-soluble pen. Thankfully, S was a kindergarten teacher, and has impeccable handwriting. I then hand-embroidered over the letters, hearts and dotted line between hearts.

mid stitching edited

I love how this turned out. It was a lot of work. A LOT of work, but I loved it. I loved the entire process of creating the template, figuring out fabric (you can’t go wrong with baby pink chevron for a baby girl, can you?), picking out the right shades of medium charcoal grey and hot rosy pink for the thread (because the standard black lettering with red hearts simply wasn’t going to work), stitching out each letter and making ‘forever in your heart’ stand out, the millions of times I had to go and spray the fabric to get all of the ink out, and finally sewing, stuffing and stitching it closed. It was all so satisfying.

As I worked on it, I kept picturing the little girl and wondering if she’d love the pillow as much as I’ve loved working on it.  Will she cuddle with it when she’s afraid of a storm? When she’s in the midst of her teenage angst, will she hold it and think of her godmother and know/feel that she’ll always have someone on her side? Will it be on her bed in her dorm room someday?

Thanks, S, for letting me be part of this beautiful gift!

Super Simple, Super Fun Camp Theme Kid’s Party

Camp Connor Collage

Last November, we celebrated my son’s fourth birthday party and we had so much fun. Fun. I keep using that word, and it makes me sound lame, but it was pure and simple fun. I’m not sure how I pulled off  taking a bunch of four-year-olds into the woods, letting them play on a rickety foot bridge over a creek, and then turned around and let them have pointy sticks and be close to fire, but I did – we all did. Not only did we survive, but we had a great time.

‘Camp’ is a pretty unusual theme, but it just made sense for us. One of my son’s favorite things to do is go for a hike in the woods behind our house, and he’s been asking to go camping for months, so it seemed like a no-brainer to make this his birthday.

I have to say, this party was a lot easier than I thought it would be. This is why I’m posting about it – at the end of the day, after everyone had gone home, I looked around and said “Man that was fun!” It didn’t cost a fortune, we all had fun, and I was able to enjoy it just as much as my guests. It was so much easier to host a full-blown kid party than I thought it would be.

I kept the invitation simple – just a burlap background with simple writing on it, and printed at the drug store one-hour-photo lab.  You can read more about my invitations in this post.

campconnorfinaledited

Party day came, and we were so excited! We hung primary color bunting across our back yard and our front porch, and covered tables and our kitchen island in primary colored table cloths (the plastic ones for easy cleanup).

Can I say one thing about the plastic bunting? It was actually the inspiration for the color scheme, mostly because it was $1 for a nine-foot length. We bought 5. They are still hanging in our backyard and I love them. It’s giving color to my otherwise winter-gray backyard. And I’m probably annoying my neighbors so, BONUS!!! Just kidding, I love my neighbors, and I’ll take down the bunting once there’s some green in the yard.

We set up our back yard to have different activities that you’d do if you were at camp:

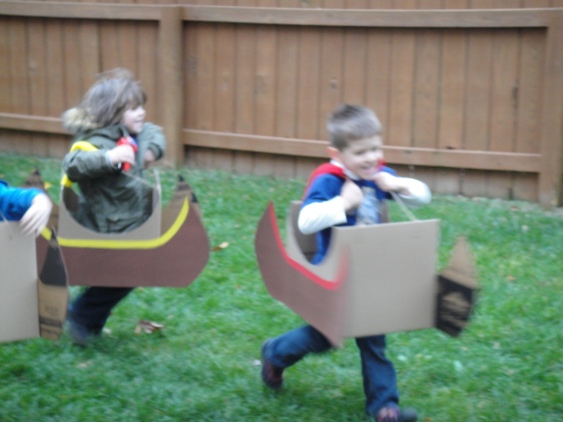
First, my favorite: These canoes made from cardboard boxes were so cute and fun. The kids had a blast racing and running around.  We sectioned off our side yard by hammering some 50-cent dowels into the ground and hot gluing some blue plastic table cloths to them to create a ‘lake’ area. Ideally, I would have filled the area with blue balloons, but a couple of our guests abhor balloons and the popping noise, so I was nice and refrained.

DSC04624

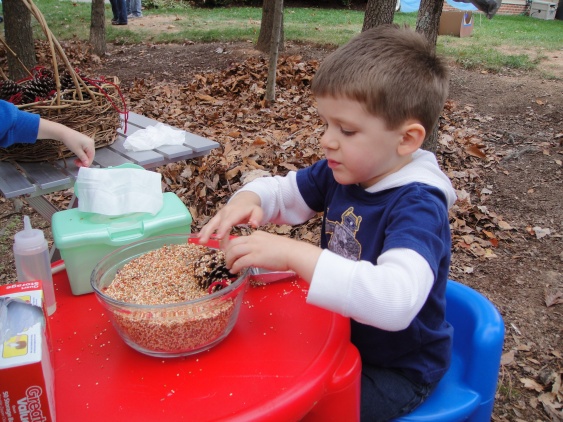
A camp party planned by yours truly would not be complete without a craft station, right? Surprisingly, it was a big hit! We made pinecone birdfeeders, and it was really easy to set up.  My son and I foraged in the woods for pinecones a couple of weeks before the party.  Then, I tied some yarn from my craft stash to them so that the kids could hang them.  I set them up in a basket with a squeeze bottle full of corn syrup, a bowl of birdseed, a box of zip top bags so the kids could have something to take them home in, and a box of wipes for cleanup. The kids squirted corn syrup on the pinecone and scooped birdseed over it so it would stick. The whole thing cost $6, and I have a ton left over. Normally, they’re done with peanut butter, but I wanted to avoid any allergy issues.

DSC04619

We also set up what we called ‘marksmanship’ which was really just a bean bag toss game that we had that we tied between two trees. To round off our camp, we set up some sports equipment, and of course, the playground was available.

I didn’t schedule the activities. I welcomed everyone, and they were all free to play and go from station to station as they pleased.

After we played for a little bit, we took the kids on my son’s favorite hike down to a stream and let them play in the woods for a little bit.

DSC04629

My son loves hiking in the woods behind our neighborhood. It was so cool to see my son, who can be shy at times, be so proud and comfortable as we hiked down the trails. I had planned to just go to the stream, but the neighborhood kids know the area well and all ran down the stream to a cracked, rickety footbridge, so all the kids followed down and we spent most of our time with our hearts in our throat waiting for a kid to fall in the water and/or the bridge to fully break. But nobody did, and the bridge survived. And I think the kids loved it.

After the hike, we headed back to the house for hot dogs (super easy prep: baked in the oven at 350 in disposable roasting pans until heated through, and then kept on the warm setting until needed), chips, cupcakes (store-bought!), and my favorite part of the whole night: the s’mores bar.

Y’all. We need to talk about this whole ‘s’mores bar’ thing. I’m here to tell you to think outside the graham. Somewhere in my planning, it struck me that it doesn’t have to be graham crackers. I started to think about different candy and cookie options. Why only grahams? Why only plain chocolate? And then I had to go for it.  I had graham crackers, chocolate chip cookies and shortbread cookies. And for the candy, I had regular chocolate, snack size peanut butter cups (not the small ones that are sold in a bag, but not the regular size you’d get at the candy stands in the checkout line) and rolos.  I could have gone crazier. I thought about having sliced bananas, strawberries, nutella, sprinkles to dip them in… but it was a camping-themed party for four-year-olds, and I went simple(ish).

I hope that if I make it to heaven, I’ll be greeted with this, my favorite combo: chocolate chip cookies with rolos and the requisite torched marshmallow.  Behold the beauty:

smore reduced

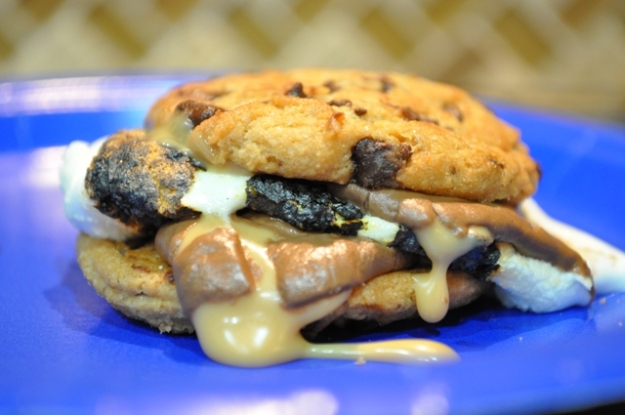
Confession: I was so wrapped up in the party that I forgot to take pictures of the s’mores bar(and pretty much everything else), so I totally made myself a s’more just so I had a photo for this post.  We all suffer for our art, don’t we?

Setup couldn’t have been easier. I just set everything out on my countertop, lit a couple of sterno fuel cans, and said “Everyone, enjoy!” And they did. You know how a lot of parents normally don’t try cupcakes at parties and act all like “Oh, I’m too grown up for that. I’ll let the kids enjoy.” ? Well, they won’t pass up a s’more bar.

This was such a fun and easy party, the way all parties should be. And the best part of it was that my son had an awesome day.

Before I wrap this up, I want to thank the ladies at All Wrapped Up Parties for this awesome post about why you should consider hosting a party at home, because it got me to finally click ‘publish’ on this post. As I read it this morning, I was fist-pumping in the air going “AMEN SISTAHS!!” So thank you, Julia and Alexis!